An Uncle Dave DIY system for cheapskates
Gear Blocks Sliding Bicycle Rack System
Until this year, my bicycle storage and workshop system really sucked. I kept my bikes in a damp, dark, head-height, dirt floored murder room under the stairs in front of our house. My workshop was a table in the front yard. I hated this, and improving this situation was one of my key requirements when we were searching for a new place to live. Lucky for me, I am now living the dream with a lovely single car garage partially dedicated to bicycles.
When it comes to spending money, I’m what you would call a super researcher. I like to know as much about all possible options as I can. Then I dig myself into a massive pit of indecision, and I stagger back-and-forth from one idea to the next, before eventually buying something with near immediate regret. This is why reviewing bikes is great! I don’t have to do any of that shit and I just ride whatever shows up. So, when I found out that Cam had beaten me to the punch on the Stashed system, I got a bit depressed, and then I plunged into research mode to figure out something that would work for me without costing a thousand dollars.
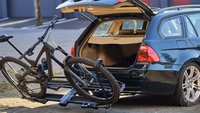
My first impulse was to use hanging door hardware. There’s a company called Slid’up that makes all sorts of trolleys and rails for fancy, heavy doors. I was very close to pulling the trigger on this. I had all sorts of spreadsheets full of costs and specs, trying to figure out the best way to hang 6 or 7 bikes. The problem was that by the time I priced it all out, I was easily up to 5-600 dollars. As well, there wasn’t a lot of dimensional or loading data available, so it was hard to determine a maximum capacity, or what sort of mixing or matching of components I could do. “Max 150 pound door” isn’t all that helpful when you’re trying to figure out how to hang 300 pounds of bicycle. Turns out people that buy fancy sliding doors don’t really need to know all that stuff.
Once I added in some fancy Park Tool machine screw hooks, the costs really were a bit ridiculous, and it became way too much money for a science project. Luckily, I stumbled upon another solution in the form of the Gear Blocks sliding bike rack hooks, which use Unistrut as a simple means to build a hanging/sliding bike rack system.
That big hunk of Unistrut is going to be the base of the new system. Cheap, strong and easy to find, it makes sense as a starting point.
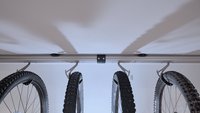
Unistrut
Before we talk hooks, let’s talk Unistrut. Unistrut (it also has other names – ABB Superstrut is another popular one) is a system primarily designed for hanging electrical components and conduit. It comes in a number of sizes and has boatloads of available accessories (including trolleys). The beauty of unistrut is that it is inexpensive, easy to find and has well documented capacities and dimensions. For example, it’s quite easy to find out that the capacity for the 12 gauge 1-5/8”x1-5/8” Unistrut/Superstrut that I was using (you can find this for as low as $50 for a 10 foot section from an electrical supply company, if you do your research) is up to 1700 lbs. on 24 inch mounting centers (depending on how it is loaded)! Handling a few hundred pounds of bicycle should be no problem. The weak point of the system is more likely to be how you mount the strut. Too few or too small anchors, or improper installation could lead to a horrendous failure. Lucky for me, I had visible roof joists to mount to, so I was pretty confident I could install a system that will survive an earthquake, and likely increases the overall strength of my garage, if anything.
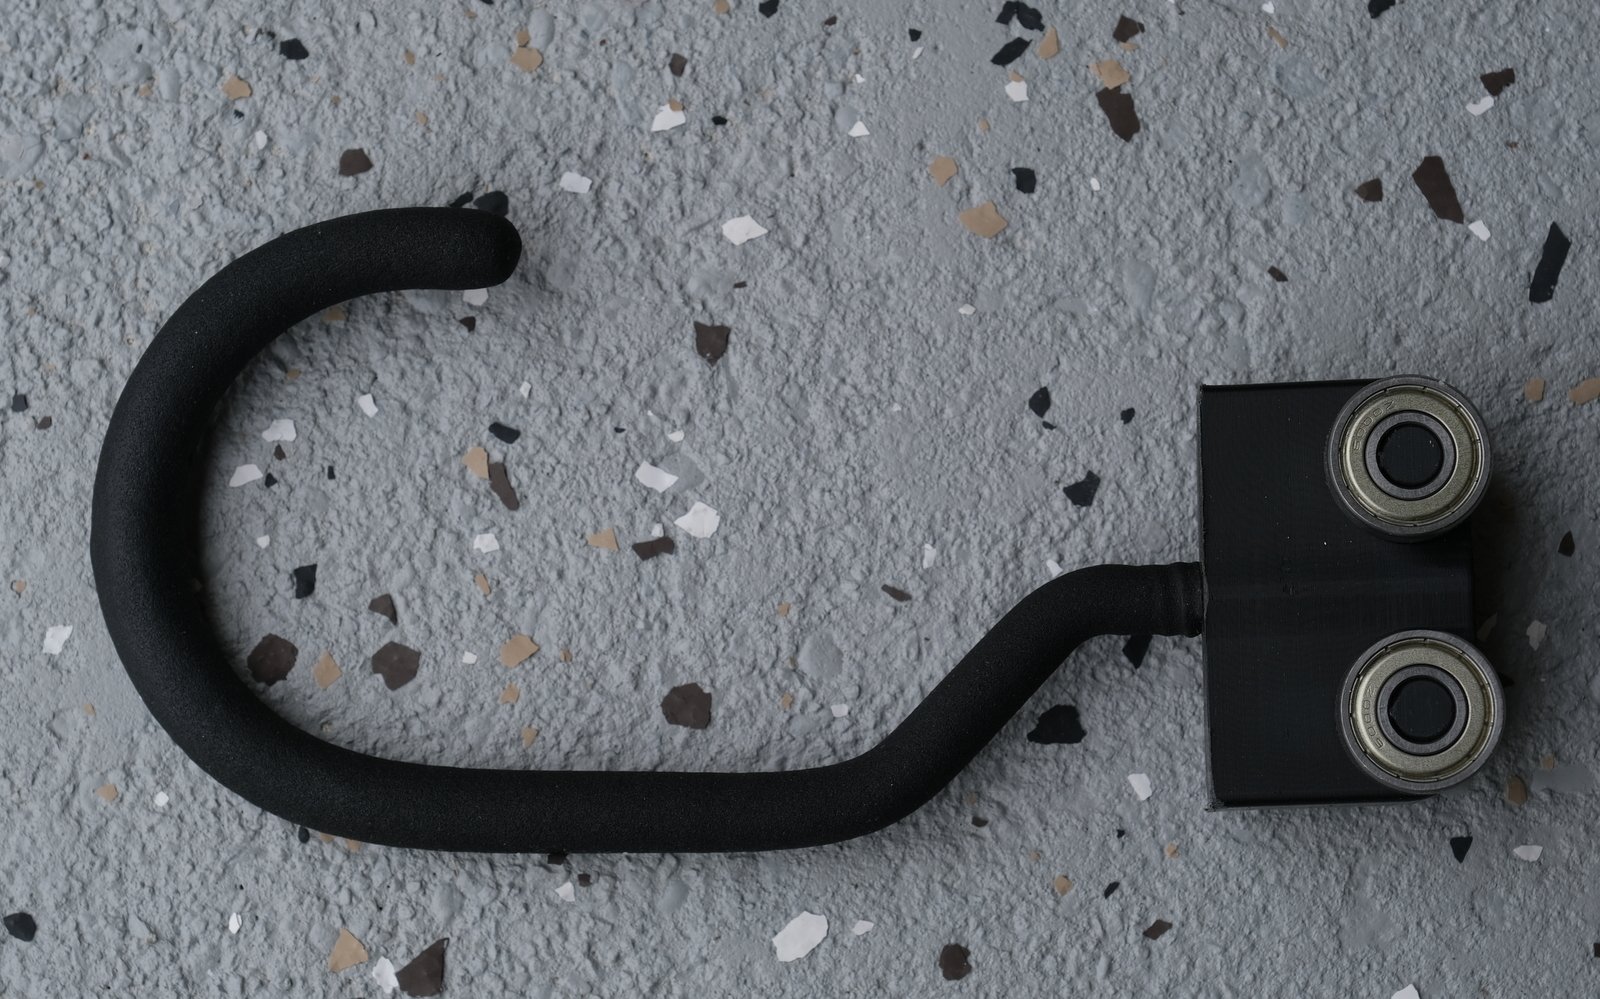
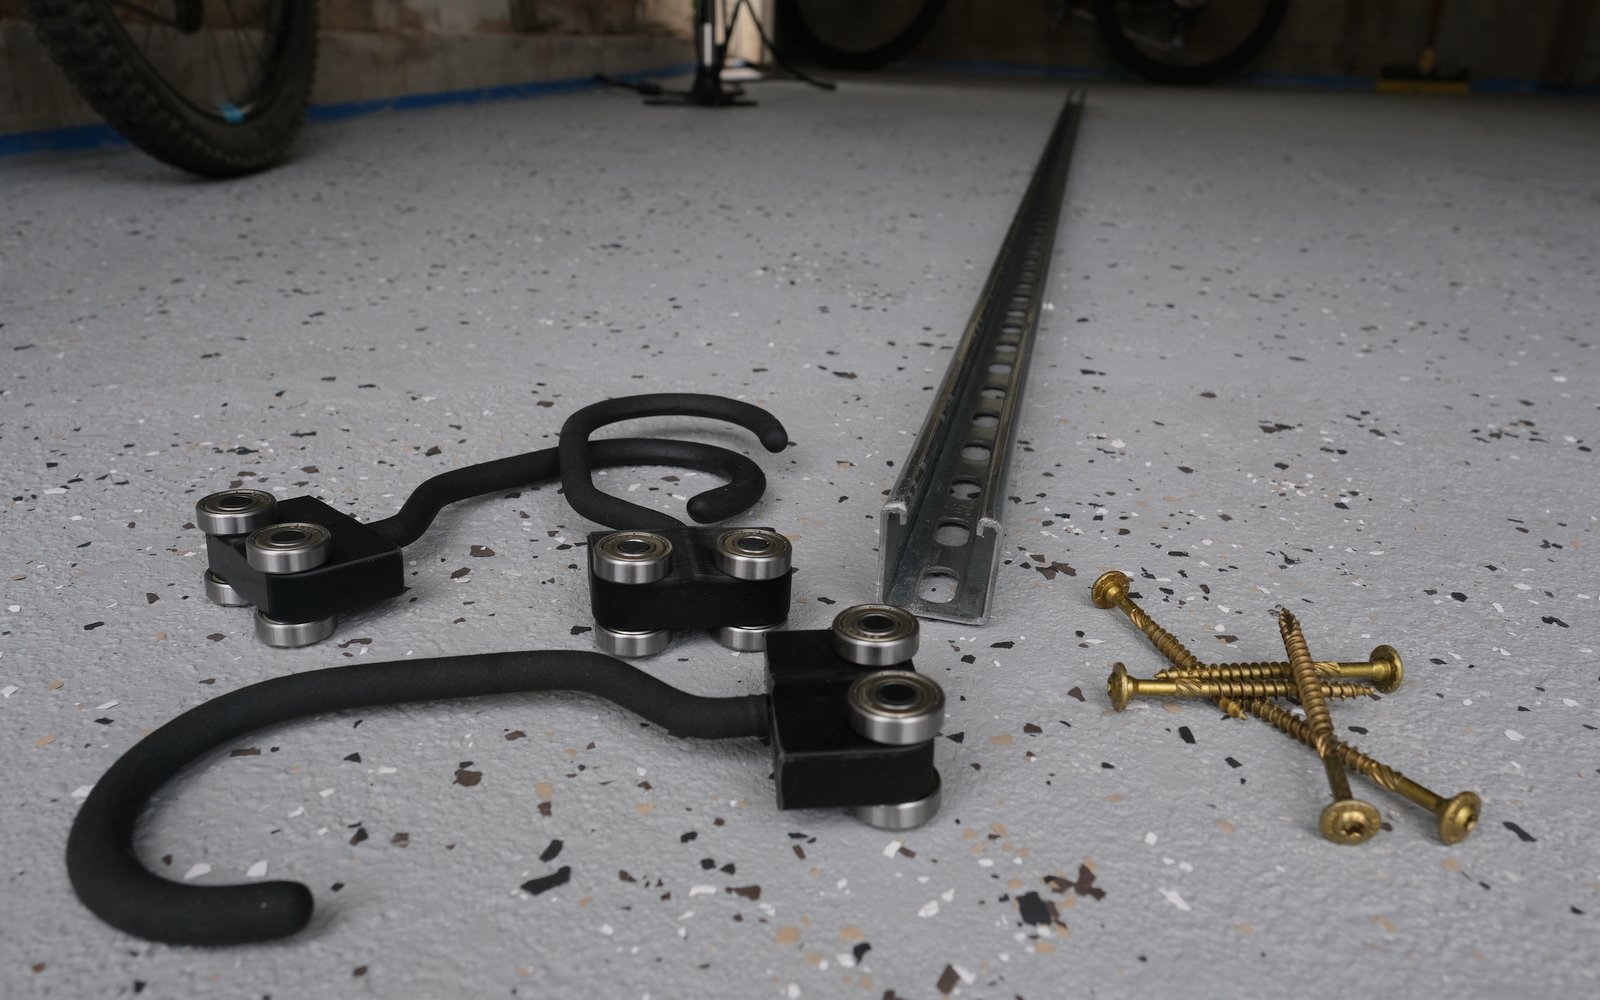
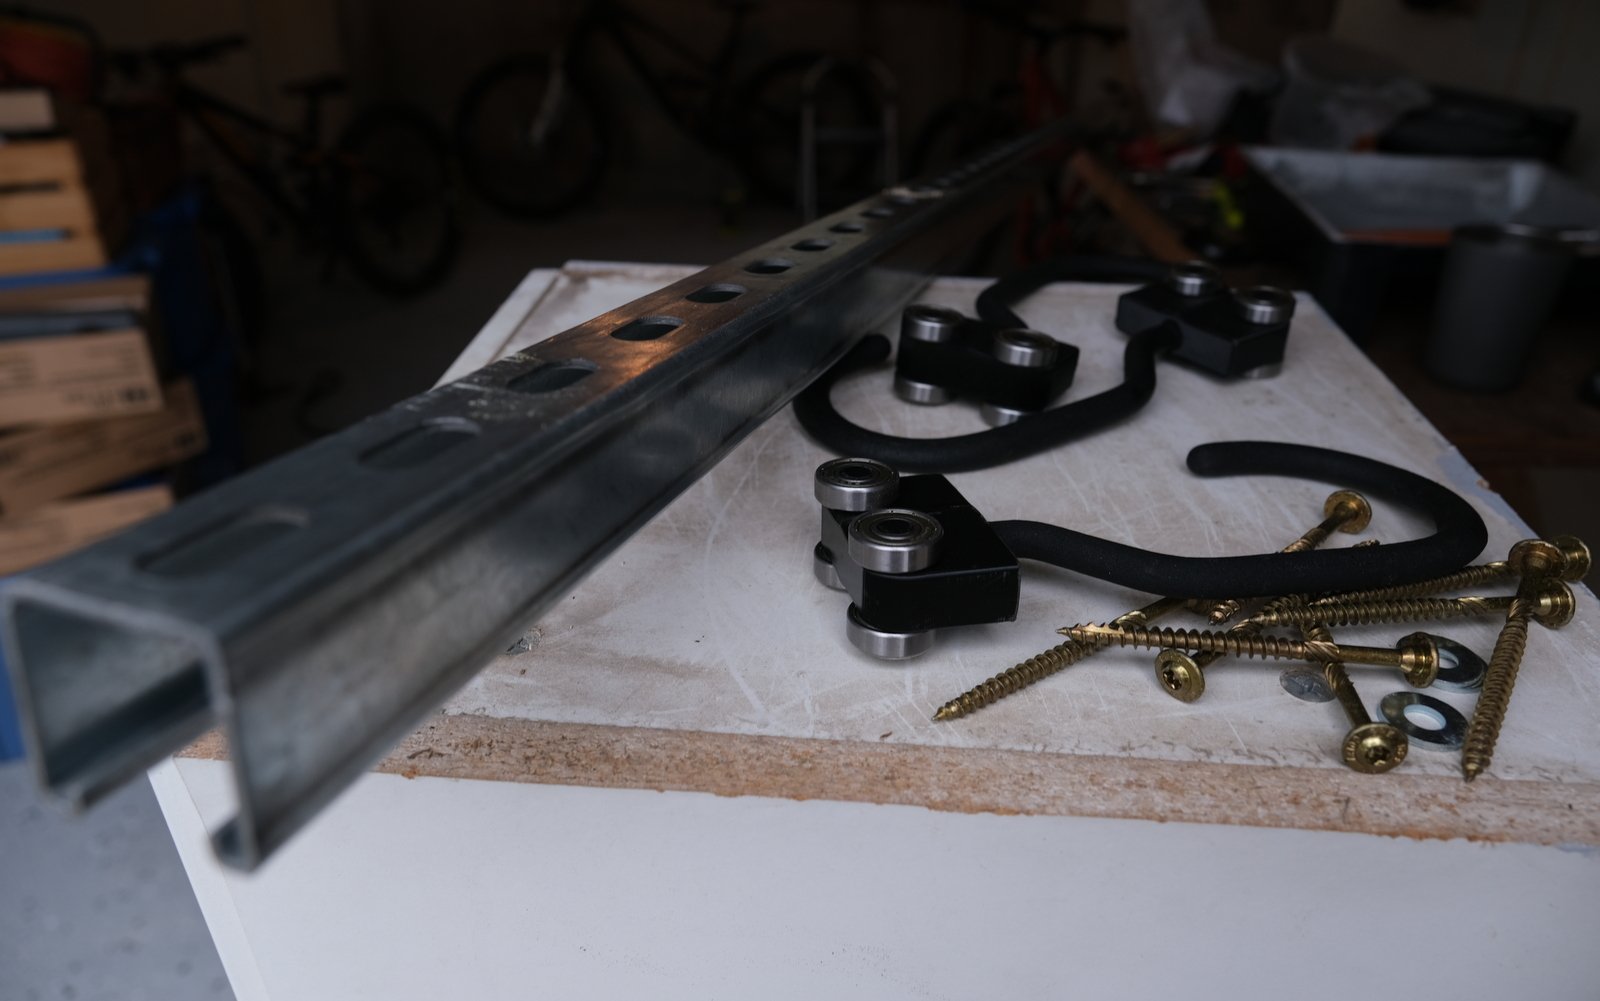
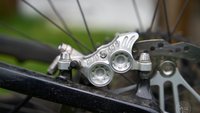
A hunk of plastic, a screw in hook and some skateboard bearings. Gotta love simple solutions.
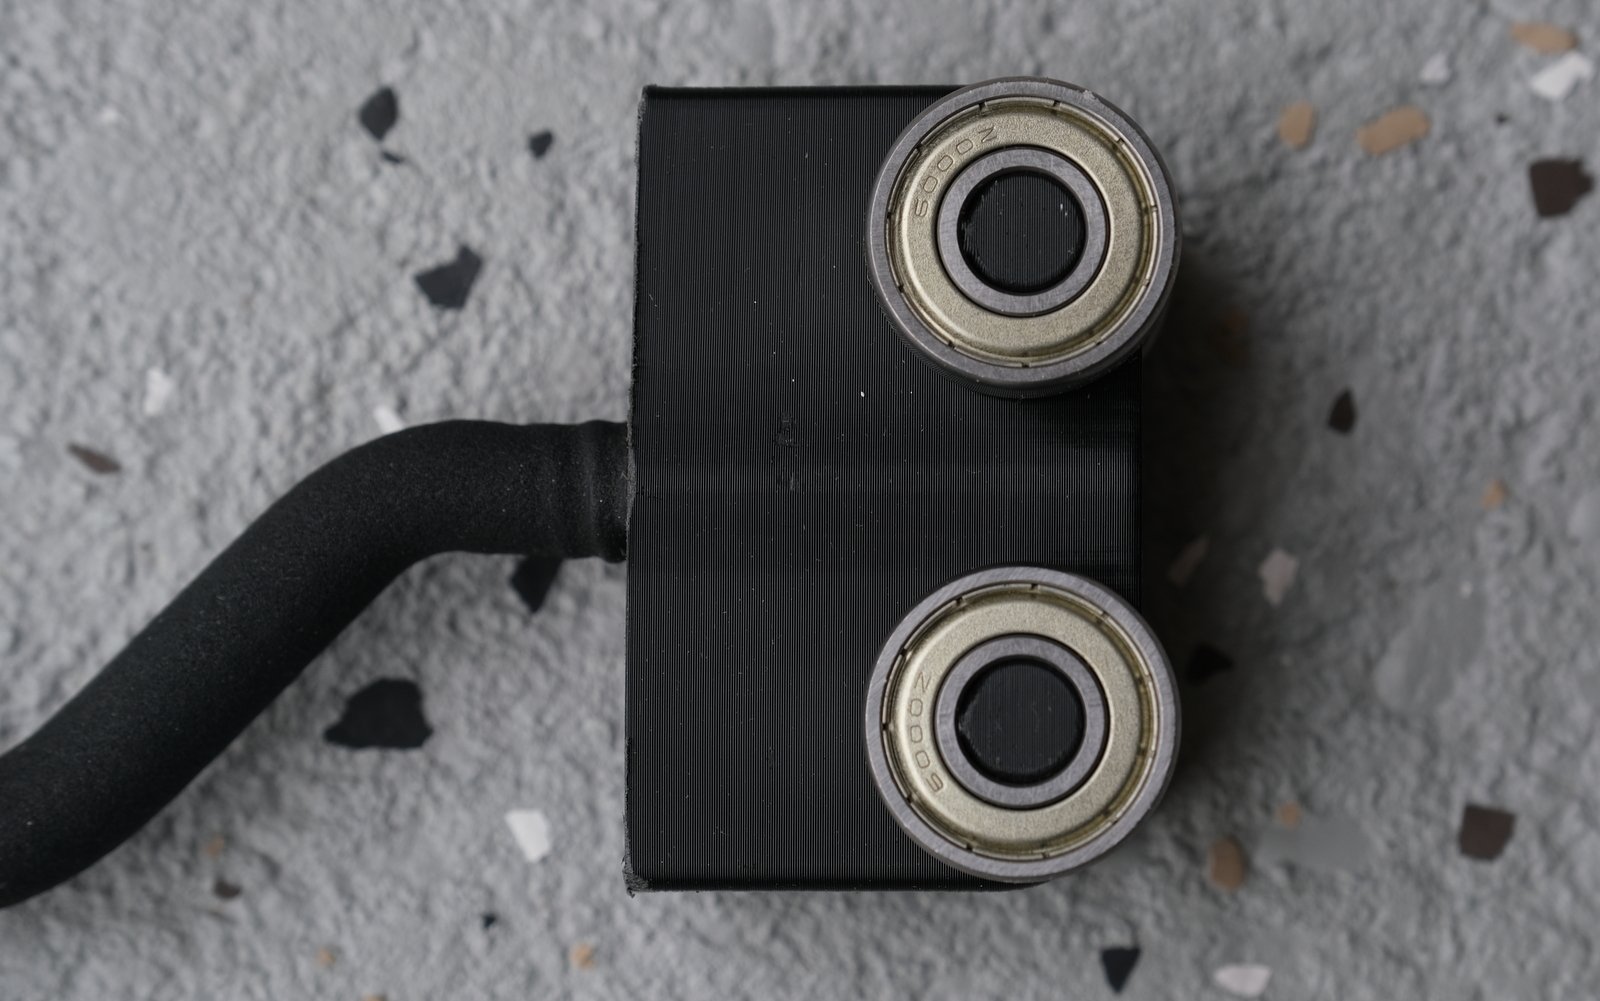
Simple, and perhaps elegant. This is not the most beautiful 3d printing that I have ever seen, but it does the job.
The Gear Blocks Hooks
The Gear Blocks hook is a very simple 3d printed hunk of plastic that uses skateboard bearings and screw in bicycle hooks to hang your bicycle. It’s US$12 for a small hook (max 35 pounds and 2.35" tire), US$20 for larger hooks (what I bought - max 65 pounds and 3.5" tire) and US$42 for larger fat bike hooks (if that’s your jam - I don't have the specs on that one). There are some package deals that will save you a bit of money, and if you have some specific requirements you can probably strike a bit of a deal by e-mailing directly. Gear Blocks is US-based, so depending on where you live, shipping might be a bit of a limitation. I felt like Canada Customs might do some funny things with “3d printed bicycle hooks” as a product description, so I decided to have mine sent to Bellingham, instead.
There’s nothing overly complicated about the Gear Blocks hook, but it is well thought out. It fits the Unistrut very well and does exactly what it is supposed to do. Could you 3d print a set yourself, if you have that capability? Likely, you could. I thought about doing so myself and had a few thoughts on some improvements (metal shafts for the bearings, for example), but I decided that I would make use of all of the energy and experience that Gear Blocks put into their system, rather than spending another couple of months prototyping my own.
Gear Blocks also has a really solid guide for designing and installing the full system. They’re only selling you the hooks, so there will likely be some design required on your part for installation, but this is fairly straight forward with their guidance. When I did my install the guide wasn’t quite so developed, and it would have been handy to have some of the spacing suggestions for deciding on how far out from the wall to install my rail. I just used an old bicycle hook that I had and tested a few different locations to decide how far out from the wall I wanted to mount. It wound up working out pretty well.

The whole system is 3 parts - The Unistrut, the hooks and the mounting hardware. I mean...most of those are made up of multiple parts, but you get the point.
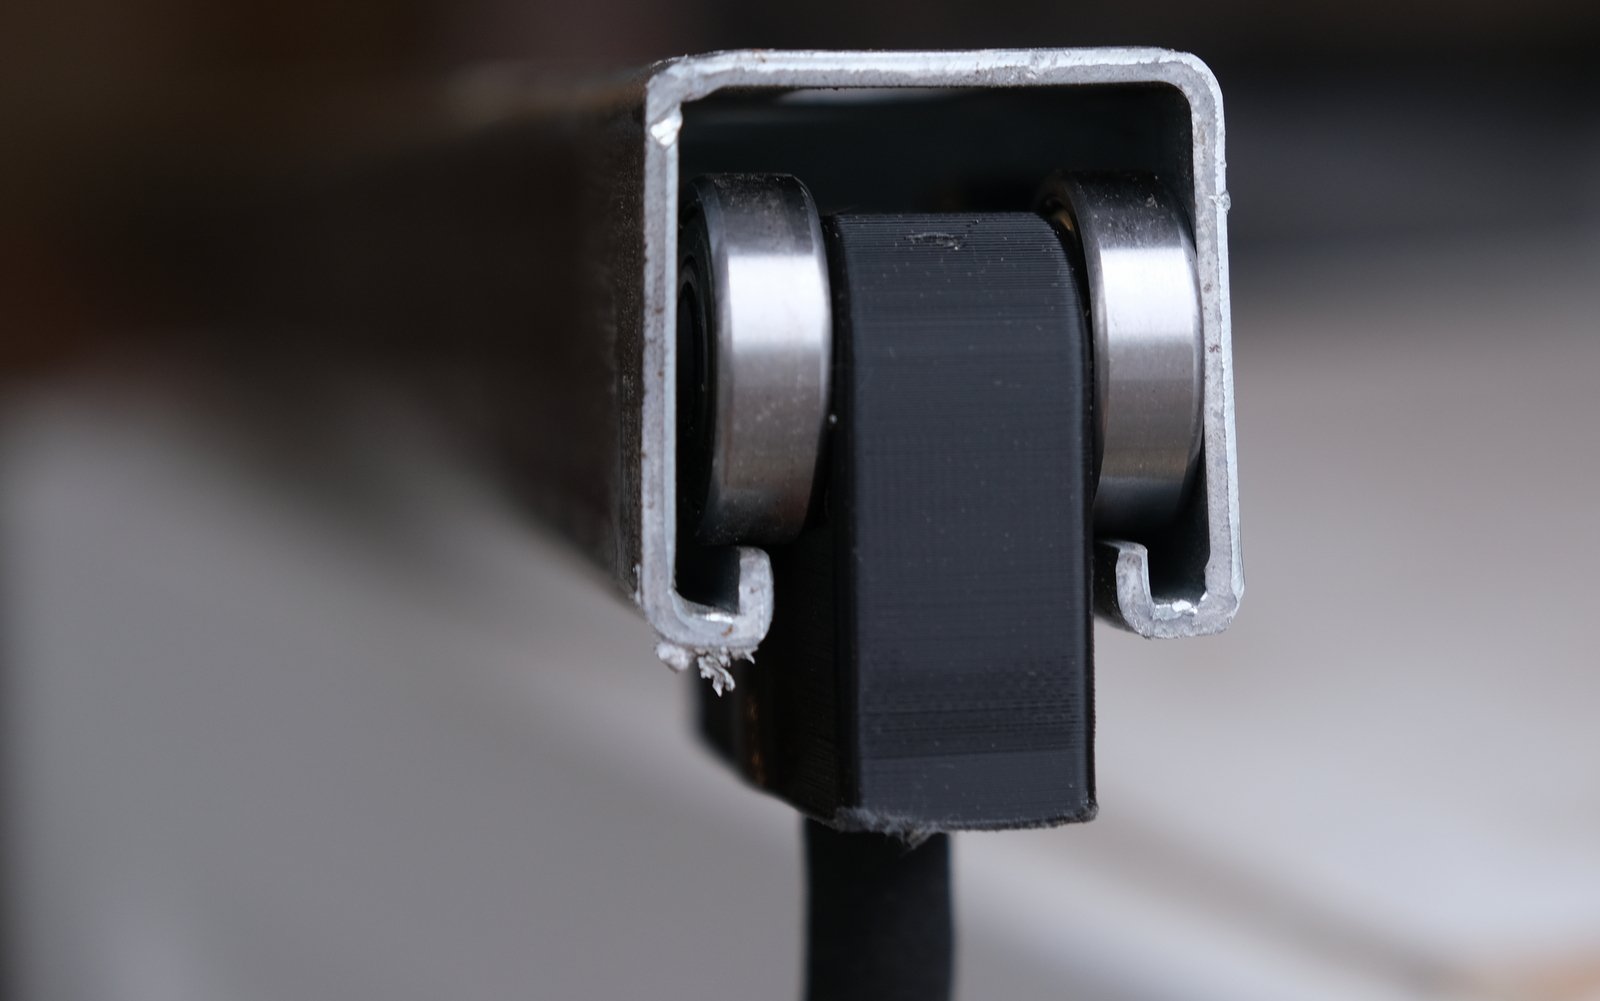
The hook fits like a glove in the Unistrut. Note there isn't much room to clear any mounting hardware you insert through the Unistrut.
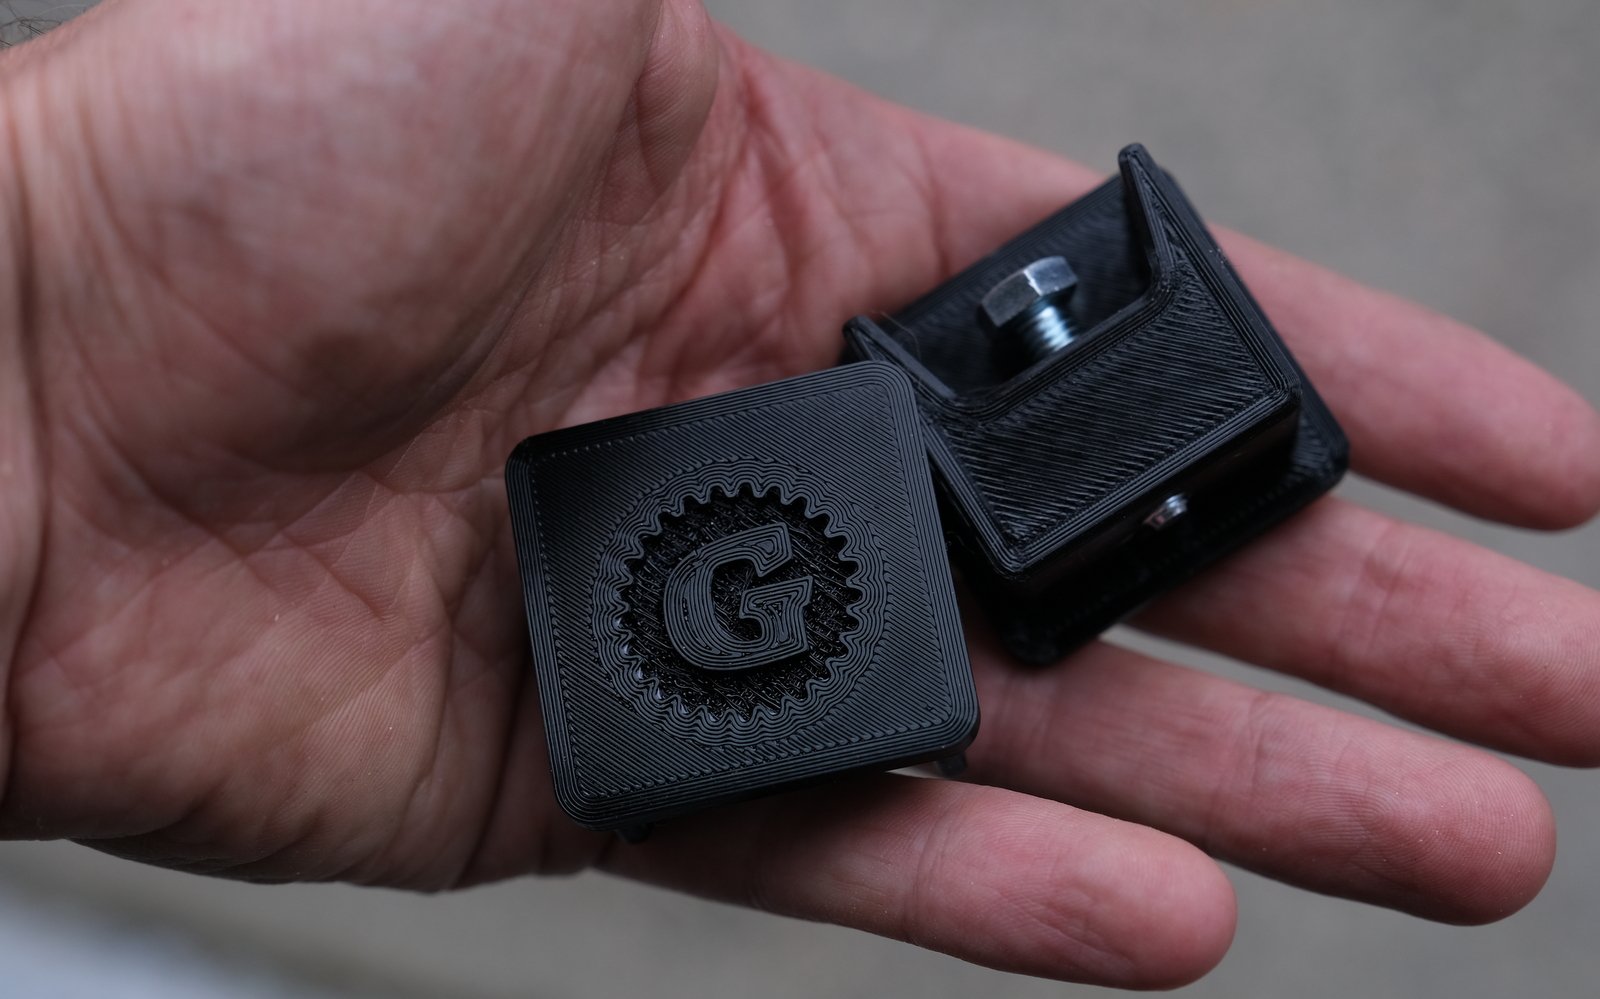
Gear Blocks also has a nice little end cap. The Z offset seems a bit too high, but I'm kind of digging the effect.
Installing the System
Probably the most complicated part of my install was getting the 10 foot Unistrut home. It didn’t quite fit in my vehicle, so it wound up hanging about a foot out of my passenger window. I tied it down in the back and crossed my fingers that nobody was going to stop short in front of me. Once home safely, installation was pretty straight forward, and I was able to complete it solo.
1) Measure out from the wall to the center of your rail. Do this on the 2 joists/points that will be at the ends of your rail.
2) Drill a small pilot hole for your 5/16” Spax or GRK low profile lag screws (I originally used 4”, but bumped up to 6” just for absolute piece of mind. As well, you do need to pay attention to the clearance from the top of the slider to your fasteners, so something like the GRK will be necessary). You’ll want 1 fender washer under each head. I also used fender washers to fill some of the gaps I had between the Unistrut and my uneven joints, but this likely isn’t necessary.
3) Rest one end of your Unistrut on a ladder (or in the hands of your helper) and screw the other end in, using the pilot hole from Step 2. You don’t need to screw it in all the way at this point, just enough to secure it. I can’t imagine doing this without some sort of impact driver.
4) Screw in the other end. Tighten both ends up. You can now mark out your holes on your remaining joists. I removed the Unistrut, drilled my pilot holes and then went back to step 3, but you may be able to leave it in place.
5) Slide your hooks in, pop on an end cap and start hanging bikes!
Gear Blocks has even more information here, and here. Why is all of this information in 3 different places? Not sure. Stop complaining.
The only problem with this system is that it assumes you have a ceiling to mount to that isn’t too low, isn’t too high, and has a number of sturdy joists or beams to bolt to. If you don’t have all of those things, or need a wall mount or something, you’ll have to get more creative, or spend more money. 1up is now making a very similar system with powder coated Unistrut and a wall mount option, for example. I’m working on tracking this system down for a comparison test, but no luck so far.
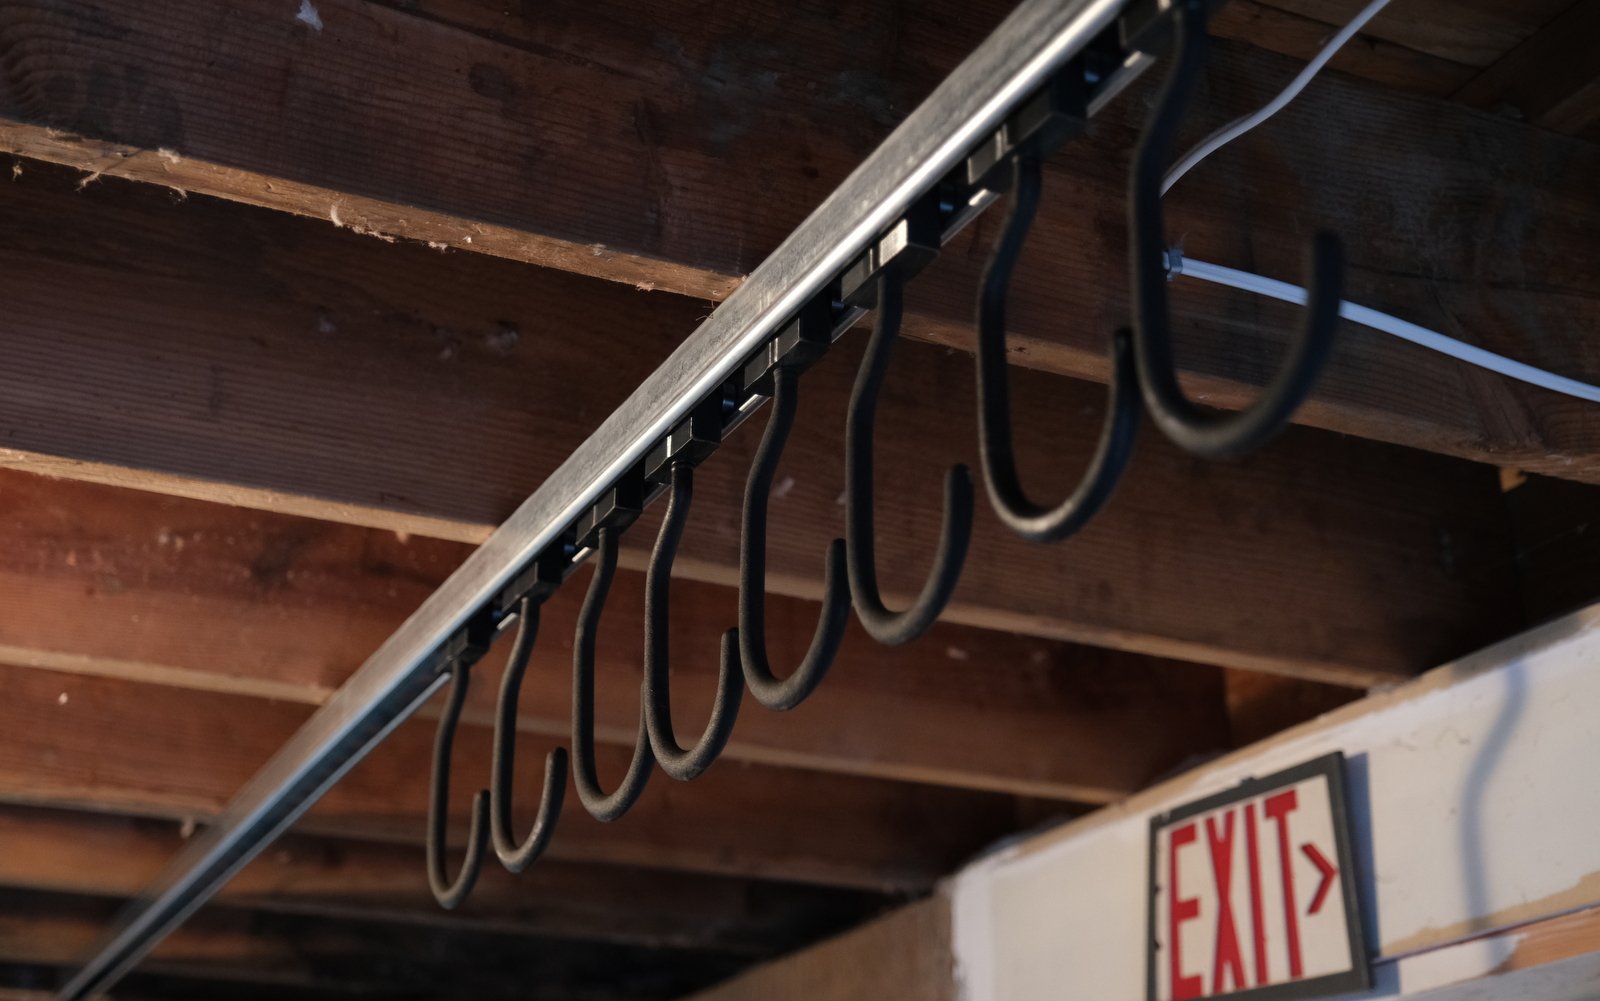
8 hooks, all ready to go for bicycles, or sides of beef
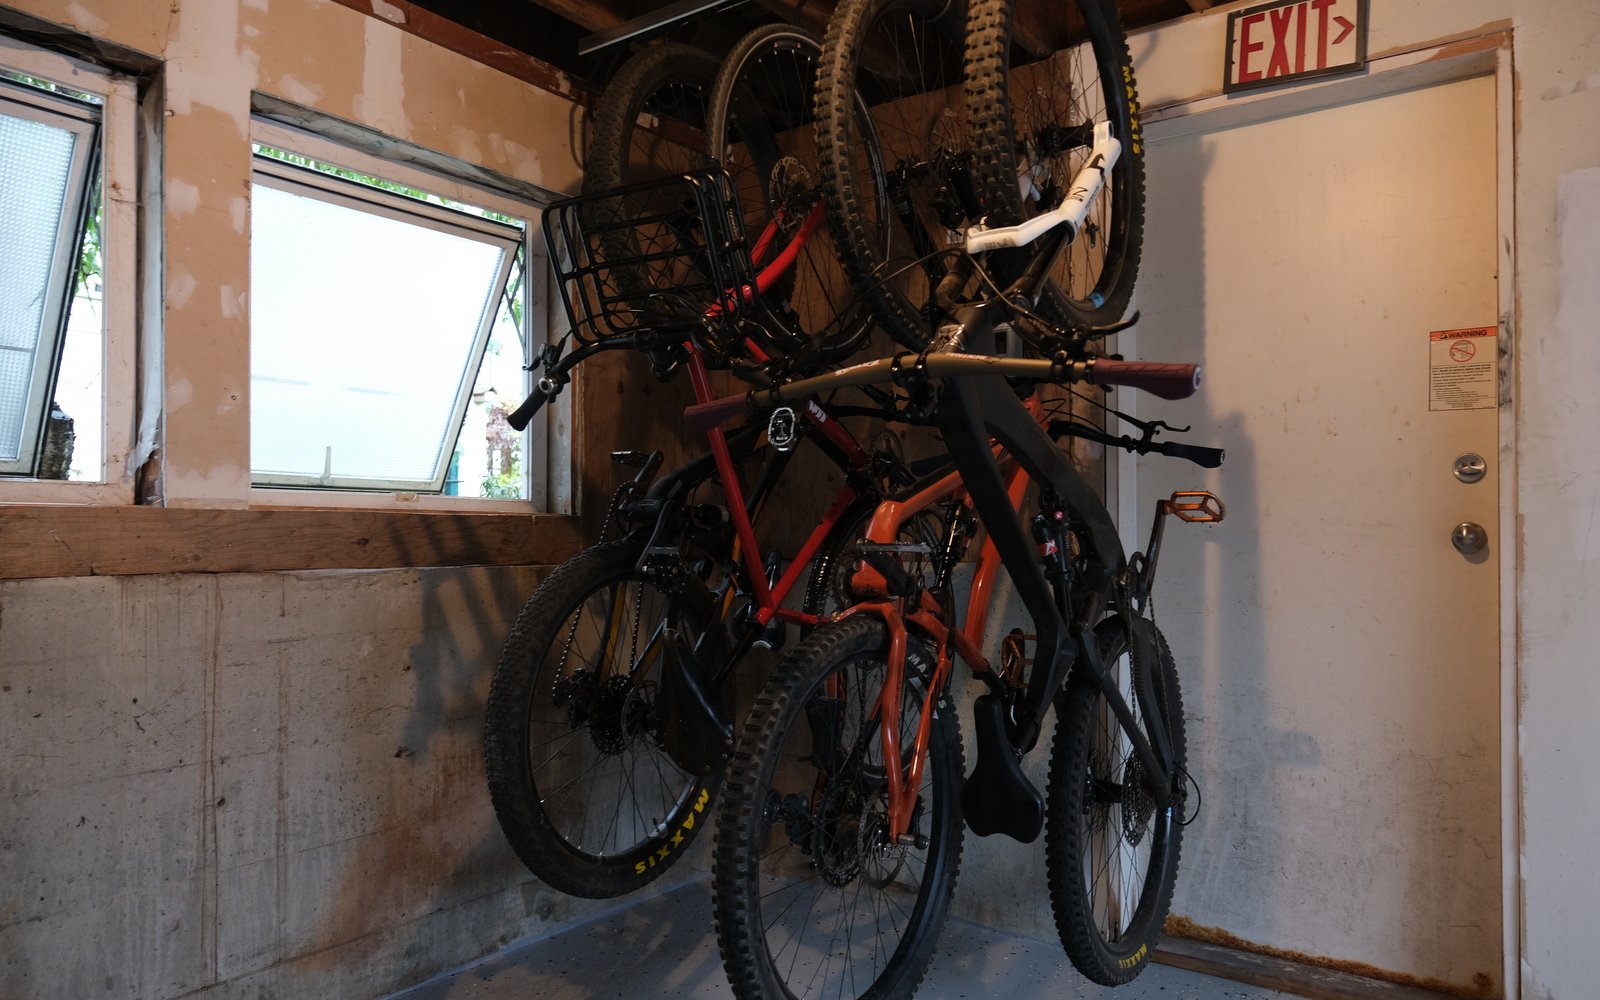
This isn't a great photo, I do realize. I meant to go back once I had all my bikes in place, but I didn't, and now it's a total mess.
Using the System
The challenge with moving is that your life becomes far more chaotic than you think it will. Luckily I got much of the work that I wanted to get done in the garage before moving day. Unluckily, all of our crap has taken over the garage far more than I had anticipated. Free access to my new rack has come in fits and spurts.
Overall, this system does exactly what I wanted it to do. It gets my bikes up and out of the way, and it lets me easily access each of them. Before I had the rack installed, the 8 bikes that I have hanging took up a huge amount of space, and it often required a lot of work to access those jammed in the back. Now, with the rack, I can concentrate my bikes in one corner of the garage, freeing up space for boxes and motorcycles to gum up the rest of the works. You just slide the bikes over a few feet and can easily access any and all.
There are a few things I would change, or at least are lacking compared to the much more expensive Stashed system. The first is that the bikes move around almost too easily! It hardly takes anything to send a bike sliding down the rail. This creates some challenges when I try to lock the bikes up using a cable lock. The cable tries to straighten out and it actually pushes the bikes away from where I want them to be. Not a big deal, but a bit frustrating.
This is total wish list, but I also wish there was a way to lock the bike to the hook/slider. I had dreams of using my collection of Hiplock security ties, just for that little bit of piece of mind. There’s no real way to easily secure the wheel to the hook, and I feel like with a bit of thought something could be added to the base of the hook before it screws in to the slider that would allow for easier locking.
And then, of course, the major feature lacking with this system is the locking/rotating feature of the Stashed system. It is a bit of a balancing act to place a bike on one of the hooks, especially since they move so easily. As well, I could see it being handy to be able to spin each bike around to change orientation. Removing the bike and spinning it around isn’t the end of the world, though.
Overall, for the price, I couldn’t be happier. In total, I spent:
- 10 feet of Unistrut - ~CAD$60
- Hardware – 6x 5/8” GRK Low Profile Lag Screws + Fender Washer + Impact friendly Torx Bit - ~CAD$40
- 8 Gear Blocks Large Hooks plus End Caps – US$120
So CAD$260 for an 8 bike rack, or CAD$32.50 per bike. It’s a really solid system that is easy to use and that securely holds a boatload of bikes. It lacks a bit of polish and some of the features of higher dollar systems, but if you’re willing to figure a few things out on your own, the price is tough to beat.
One addition I made was to buy some wide velcro and make some pedal covers. These aren't pretty but do the job of preventing my pedals from gouging the next door neighbour. I should probably add another $15 into my total price.
Next Steps
My current 8 bike setup is full, and I have a couple more bikes to make room for. Plus, I want some surge capacity so that I can get a bit crazy with test bikes. My plan is to install a second rail right beside the first, and add 4 more hooks to the system (hopefully the 1up version for comparison). With 2 rails, I think it will allow me to play around with spacing a little bit and move individual bikes either closer or further away from the wall, as needed. I should also think about getting rid of a few bikes.

Comments
BarryW
3 months, 1 week ago
Good stuff Dave!
Although the carpenter in me wants to let you know that using 6" screws is not a good idea as you have a high likelihood of running them into something traversing your joists. Think water lines, power lines, etc.
A 3" screw is far stronger than you think. I would recommend using nothing more than that to minimize the risks of hitting something in the framing.
Reply
BarryW
3 months, 1 week ago
And for fact checking, I just put a 3" x #9 wood screw 1-1/4" (buried the threads only) and hung from it using my hammer and bouncing and I'm 190lbs with my tool belt and screw gun on me.
You could easily hang several thousand pounds with a bunch of 6" screws!
P.S. I just did it again with only an inch into a new piece of framing (and therefore soft compared to 'old' wood) and it didn't budge.
Reply
Dave Tolnai
3 months, 1 week ago
This is good advice. In my specific circumstance, there isn't really anything up there. Everything is exposed, there's no water and the electrical is minimal and visible. I just thought "man, it would really suck if one of thos pulled out!" so I just went for it. Total overkill.
Reply
BadNudes
3 months ago
Thanks! Good to know for those about to go at it behind a sheet of drywall with one of those $20 stud beepers!
Reply
ackshunW
3 months, 1 week ago
Great read, can appreciate and recognize your buying process!
These threedee printed blocks are clever no doubt, love the printed axle stubs. Why not?!?
But overall it’s clear the 1up version is way better value proposition, those look really nice for the cost. And even though I’m sure they’d prefer to sell you the system, got to hand it to them that they commit to the spare parts, ala-carte model.
Reply
SteveR
3 months ago
So, on a snowy Sunday morning, after being inspired by the article and picking up track and hooks during the week, I put my cheapskate system into action. As I mentioned previously, I found "strut channel" at an industrial supplier, at $20 and change for 10 feet, and on the same outing I picked up hooks at Princess Auto: $3.99 for packages of 2 smaller ones, $5.99 for the larger "bike hooks". For sliders, I cut blocks from scraps of high density polyethylene "puck board" aka "arena board", that I had leftover after a riding arena project, from back before I retired from construction. Once the track was up and one prototype slider made, I tested the large size by hanging my 200 lbs of it. Good to go! Weighted with bikes, the hooks move easily enough, and while the plastic sliders might wear in the long term, it's not like the collection of bikes, both ours and those of the grandkids, will be moved on a daily basis. A note on mounting: in my case, this went on a drywalled drop ceiling, where 2x4's on flat that could not necessarily be relied on for weight bearing had been suspended below the structural floor joists. This required using 6" x #12 screws along with washers, to go right though and into the floor joists. It works great, AND, I avoided a bathroom painting project for another day!
Reply
Todd Hellinga
3 months ago
good slider solution!
Reply
oskee6
3 months, 1 week ago
I did this exact setup in my garage last august - pro tip for buying the unistrut - I measured the length I needed for limited space, and cut it in the parking lot with a cordless reciprocating saw so it would be easier to transport - may not apply if you're running the whole 10 ft section, but it was helpful for me to get it into my wife's compact SUV without worrying about scratching something.
Reply
BarryW
3 months, 1 week ago
This is a great tip! And all you need is a low cost hacksaw and a decent blade.
Reply
Dave Tolnai
3 months, 1 week ago
I'm just wondering how long it would take for the fine folks at Gescan to come out and yell at me for shooting sparks across their parking lot. I used the full 10 feet though...but a good thought, for sure!
Reply
fartymarty
3 months, 1 week ago
Dave - this was something I was looking for a few months ago. I ended up with £12 wall brackets from Amazon which aren't as good but were cheap. I do like the idea of using Unistrut - it is such a good system.
On another note are you planning a series on the "Bikification" of your garage?
Reply
Todd Hellinga
3 months, 1 week ago
I've been eyeing up beefy wall brackets for one of these set ups as we'd have to put it under the garage door rail so can't use rafter joists to anchor.
Reply
Fat_Tony_NJ
3 months, 1 week ago
Nice system! I have to say that the spring-loaded trolleys that 1-Up is selling look like something you could homebrew up...
Link
...or they might just be worth the $9 penalty over the 3-D printed ones.
Reply
Dave Tolnai
3 months, 1 week ago
My big question on the 1up trolleys is whether they will clear the lag bolts, or if you need to use some kind of external bracket for mounting the unistrut. If they will clear, it could be a great option. If they don’t, it adds another layer of complexity.
Reply
Rick M
3 months, 1 week ago
These mounts would eliminate that lag bolt clearance issue: 4 Pack Channel Trolley Track Hanger Bracket for All 1-5/8" Strut Channel,Heavy-Duty Track Intermediate Support Hanger https://a.co/d/bfutOns
Reply
Mark
3 months, 1 week ago
Those would also be great in helping to tighten up the track a bit to reduce movement.
Reply
Kenny
3 months, 1 week ago
1up include the external brackets so I think you guys might be overthinking this.
Reply
Onawalk
3 months, 1 week ago
You can see in the pics of the 1-Up setup they are using Uni-strut bracket to hold up the unistrut. It looks like the spring loaded units "lock" in place when there isnt a bike hanging on it, which could be good/bad depending on your setup. It also looks like theres enough room to drop the hook down so it doesnt pop up enough to contact the unistrut if theres no bike hanging, which would also clear most hardware.
I built a similar system using Unistrut, and unistrut trolleys, and just drilled holes in the Unistrut with counter sunk #12 screws. More than sturdy enough to hold 8 bikes, and the trollys pass right on by with no issues.
Reply
Dave Tolnai
3 months, 1 week ago
There are a bunch of ideas in here:
1) Ya, I saw that 1up is using the brackets. I'd really prefer not to have to do that. It reduces clearance a bit and ups the complication factor. It's super easy to just bang a bunch of lag bolts through the Unistrut. Lining up a bunch of brackets feels like an unecessary extra step.
2) On the clearance - that's it exactly. It looks like the spring holds it in place, but the big question is how much clearance with the spring retracted? If enough to clear a lag bolt and washer, great, should work no problem. If not - again, you're in to a more complicated bracket mount.
3) Interesting to see an Amazon hanger option!
Reply
BarryW
3 months, 1 week ago
The 5000 series unistrut is extra deep and will easily clear most any mounting bolts, even larger hex heads.
It would be an easier installation without the extra brackets, and would look cleaner.
Reply
Dave Tolnai
3 months, 1 week ago
Good idea if clearance is an issue. The deeper strut is less available though and will probably cost a bunch more money.
Reply
brewtus
2 months ago
Confirmed that the 1up trolleys will not clear GRK RSS screws even without washers. The threaded hook end retracts into the trolley body (and can be adjusted), so I'm fairly certain it would clear a lower profile screw if necessary. For my installation I needed to use trolley hanger brackets to clear ceiling tiles anyways so it didn't matter.
Reply
Mark
3 months, 1 week ago
Nice. I've got a couple thoughts on some of the issues mentioned. For the low cost of the Unistrut I'd buy two lengths and offset them to increase clearance for the bikes and to be able to pack them in to a tighter space. To help keep the hooks from moving so easily take a pair of Vice Grips and give the channels a bit of a squeeze to tighten them up a bit and increase the friction between the hangers and the Unistrut.
Reply
Dave Tolnai
3 months, 1 week ago
Ya, the two lengths offset from one another is exactly my plan. It will just allow for a bit more fine tuning.
I like your idea of squeezing the Unistrut, but with the 12 gauge it might take more than a pair of vice grips. I think it would be tough to control this enough to make it consistent, as well. So, I'll probably just deal with it.
Reply
Mark
3 months, 1 week ago
Well I've been single for a while, so my forearm strength is pretty good. A C-clamp would do the trick too, and it would be easier to control the amount of pressure. Or some quick clamps used in wood working. I have some you can use if you want - just drop me a pm. I'm usually on the shore 2-3 days/wk.
Reply
SteveR
3 months, 1 week ago
As floor space in our bike room continues to shrink as we accumulate decent bikes for 3 grandchildren ( they have daily driver beater bikes at home, and the good bikes live here for safekeeping ), this is very timely. Thanks for the inspiration, and it's great to see more Uncle Dave content! Pulls up online catalog of local industrial supplier...
Reply
DanL
3 months, 1 week ago
Very cool Dave, I'm excited to see that there are curved struts available as well
Reply
finbarr
3 months, 1 week ago
I love this article. This is such a great project. I'm very inspired.
Reply
Couch_Surfer
3 months, 1 week ago
The cheapskate in me went down a rathole trying to figure out how to DIY those trolleys. TLDR and the 1up and gearblocks pricing is good value. Aliexpress on the trolley mechanism is ~10 bucks per unit (with no hook, and shipping is a bit of a hit).
If someone has a 3D printer and really wants at it, the cheapest I could figure out would be bearings and coupling nuts purchased separately
http://tinyurl.com/mwyzvm9p
http://tinyurl.com/3nd935uf
Even that would get you to about 6-8$ for the bearing mechanism and then with 10$ for the Park machine thread hook. Farting around with a 3D printer and it seems like buying is the better option. Just need to time it with next time I'm in the USA and can avoid shipping/brokerage costs.
Reply
Dave Tolnai
3 months, 1 week ago
That's kind of where I got, as well. The price from Gear Blocks is super reasonable, not a whole lot more than what most of the parts would cost, and requires a whole lot less futzing. Any "improvements" or costs savings would be marginal.
Reply
rusty904
3 months, 1 week ago
I used these trollies and a box rail from ace hardware for my bike storage build. It was the cheapest sliding hook solution I could come up with and so far seems to get the job done. I already had plastic dipped hooks to use on hand. Had I known about these gearblock hooks, I think I would've gone that route.
https://www.zoro.com/zoro-select-4-58l-x-1-1732w-hanging-door-track-4pe57/i/G1834445/
Reply
Dave Tolnai
3 months, 1 week ago
I've updated to add max widths and ratings in the main body. For anybody that missed it:
Small - max 35 pounds and 2.35" tire
Large - max 65 pounds and 3.5" tire
Fat - I don't have the specs on that one
Reply
Dave Tolnai
3 months, 1 week ago
Update #2 from Brian at Gear Blocks. He's making a wall mount! Available here.
https://shop.gear-blocks.com/product/wall-mount-bracket-for-unistrut-sliding-bike-storage-rack/
He also pointed at this gallery of different set-ups, for installation inspiration.
https://shop.gear-blocks.com/the-ultimate-unistrut-sliding-sliding-hook-gallery/
Reply
Dave Smith
3 months, 1 week ago
If I had a garage rather than an apartment something like this with casters would be a solution. Also the 2fer of a rack.
Reply
blacksheep
3 months, 1 week ago
https://northshoreracks.com/products/moveable-garage-stand/?v=3e8d115eb4b3
Reply
Dave Tolnai
3 months, 1 week ago
Where do you put your bikes when you need the rack on your car? Just bring them all along and select the correct one at the trailhead?
Reply
Dave Smith
3 months, 1 week ago
It might be part of my freelance-never-lock-me-down-ways but I like the idea of a modular garage set up so I can move things around depending on what the need is.
Reply
Dave Tolnai
3 months, 1 week ago
I like that idea. I just don't understand what happens if you have 4 bikes hanging on the rack and then go for a ride and only need 1 of those bikes.
As well, I find loading a bike onto a North Shore Bike Rack to be one of my least favourite pre or post ride activities.
Besides, if you really want to change things up, it wouldn't take all that long to re-mount the Unistrut, depending on your particular garage setup.
Reply
Blair Robinson
3 months, 1 week ago
I did something similar. Bought some heavy duty sliding closet door track units and bought those vinyl coated ceiling hooks. I cut off the threaded end and carefully ground each one so it could be insert through each roller. I made a fine cut all the way around with a dremel so that I could snap a lock washer to hold it. No idea what it's rated for but I currently have six bikes up there. I'm able to slide along and rotate.
Reply
SteveR
3 months, 1 week ago
It's worth shopping around at your local industrial suppliers! I just picked up a 10 foot length of 1 5/8 "strut channel" for $21.47 at Calgary Fasteners, versus $90.00 for "super strut" at Home Depot.
Reply
Dave Tolnai
3 months, 1 week ago
Absolutely! Shop around and don't buy this from Home Depot. I found most industrial electrical supply companies will have more selection and better prices. You may have to phone around a bit.
Home Depot in Canada seems to only have the 14 gauge version, and it's $100 or so. I got my 12 gauge for around half that. 14 would probably be enough, but it just seemed like if I was going to go to all of the trouble, the extra thickness gives me a bit of peace of mind.
Reply
Troy
3 months ago
I did this a few years ago. But I used barn door track and the trolleys that work with the rail. I used vinyl lock nuts on the hooks so I could tighten them down so they spin slower to make it easier to hook
It takes a little trial and error to nest them so they fit together tightly, but it’s so nice being to pick the bike you want to grab without moving every other one.
Reply
McT
3 months ago
Fixed 3m unistrut to the joists in the garage with U bolts (screws would have been lower profile and would have saved a couple of trolley redesigns...) for max strength although that's probably overkill.
Cost all in, £14 for 3m unistrut (41.3x41.3), £48 for 6 small and 2 large hooks, £15 for u-bolts, washers and nylock nuts, £20 for lots of 608 bearings and £5 for the filament used to make the 8 trolleys.
So just over 100 quid for 8 bikes
Going to get another 4 small hooks as there's plenty of space and design and print hooks to fit a pole so I can have helmets and shoes hung up as well.
Reply
Please log in to leave a comment.