Great first post, Jim. Looking forward to seeing your initial reports, Taz and Ryan.
Great first post, Jim. Looking forward to seeing your initial reports, Taz and Ryan.
Thanks to NSMB.com for giving me the opportunity to review these wheels. Please feel free to ask questions or PM me. I check the forum several times a day, so I should be able to respond quickly to your queries.


Initial impression:
My initial impression of the DT Swiss E-1700 29er wheels is very positive. Like JimLad, my wheels were each marked with a QA-type tag which I appreciated knowing that there were a set of actual human hands who checked everything over before they were shipped. Without a doubt, the wheels pass the sexy test. Nice decals (not stickers), satin finish and nothing seemed to be loose or out of place. Spoke tension was all fairly even from the pluck-test.
The wheels came with a tubeless kit (tape/valves), but the instructions were incomplete in my opinion(see below). I fitted the rims with one layer of tape and was able to easily mount up my Hans-Dampf/Racing-Ralph combo that I had been running on my previous rims. Minor fiddling required, but they mounted smooth with a floor-pump. These are 26mm inner diameter rims, which is a bit wider than I normally run. The Hans-Dampf and Racing Ralph tires did flatten a bit with the new profile, but the side knobs are still prevalent on the contact patch. If you are running a more square profile (HRII for example, keep this in mind)
I run a 6-bolt rotor, and though that the center-lock assembly was pretty slick. The rotors mounted perfectly to the six prongs on the center-lock, and was easy to tighten up with a bottom-bracket tool. Using a 6-bolt or Shimanos centerlock rotor has no impact on hub selection from DT, and also allows for some future flexibility with rotor selection. The kit is complete with axle adaptors to quick release. I applaud DT Swiss for their engineering thought process. Minimizing tooling for hub selection is a great way to not only save money as a manufacturer, but also provides the customer with options.

Rotor installed

Install the ring directly to the hub

Connect to the center-lock and add the rotor

Rotor sits cleanly onto the 6-prongs

Add the locking ring and the rotor is securely connected
HUB Assembly: Something I didn't originally comment on.
I was impressed that the DT Swiss folks believe in full-bore cassette installation.

The grooves for the cassette install look like this rather than….

i.e. solid grooves vs, hollow or intermittent.
Concerns or issues from my initial impression:
Now that I have read Jims first post, I was disappointed to hear that I should have put on two layers of tape. The tubeless instructions for the wheels only seems to focus on the tubeless valve assembly, without mention of the tape installation, so I reverted to what I knew with Stans or Gorilla. Speaking of tape, I was not a fan of the DT Swiss brand of rim tape. To put it simply, it did not stretch well, and I found I had to spend quite a bit of time working the tape onto the rim and removing air bubbles. I also felt that the tape lacked a bit of adhesion (stickiness), so Im curios what I will see when I take the tires off after a handful of rides.
First ride impressions are coming up once I can get some pictures.
-Gord
Hey NSMB.com!
I'm the final tester for these wheels, and after a good ol' fashioned wild-goose-chase with UPS, I received my test set yesterday. Everything looked good, and I promptly attempted to mount up some new rubber (Schwalbe Magic Mary 27.5 x 2.35). To my dismay, I could not for the life of me get the bead to seat with a standard floor pump. I must have spent an hour trying - finally giving up when I realized my patio deck was completely painted with a thin layer of Stan's sealant and soapy water. I've never had this kind of trouble before, and I did notice that the tire mounted almost "too" easily onto the rim - leading me to believe that the bead interface between this rim and tire combo is looser than most. After this frustrating experience, I'm inclined to pick up a CO2 cartridge pump - for the sole purpose of seating finicky tire beads. I'll try this, (or an air compressor) tonight.
For the record, my stock wheels are Sun Helix TR27 rims laced to a DT 350 rear hub, and a Formula front hub. After a few months of general abuse, I'm very happy with these wheels - only very slight wobbles on the rear rim.
Looking forward to riding the bejeezus out of these new DT wheels. Stay tuned…..
So, after successfully mounting the Magic Mary as my front tire using a compressor, I turned my attention to the rear tire - a WTB Trail Boss. This tire was much more difficult to install onto the rim - I was just barely able to mount it without levers. I was confident this tire would inflate much more easily, and sure enough, it caught on the first pump stroke.
The lesson learned here is that the Schwalbe Snakeskin casing is a super loose fit. I'm sure this would be the case on any rim.
So far, so good on the wheels. Now I just have to ride them…..
First Ride


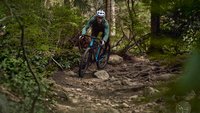
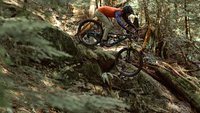
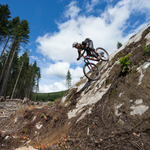
My testing rig. Transition Bandit 29er with 120mm rear and 140mm front.
If Im going to test a wheelset, I figure I should put them to a good test right off the bat. My 230# (with gear), took these babies onto some Seymour rock gardens and shale to see what happens when I pick creative lines. I am happy to report that this is the first new 29er wheelset that I have ever ridden, where I did NOT hear any twangs or pings from the rear wheel on the first ride. After bouncing around for an hour, I checked the spokes and it all sounded just as even as the first check upon mounting the tires. I am amazed that the spoke tension stayed true through ride #1.

Can't go around it, can't go under it, gotta go through it!!

Rumble rumble, best way to test some wheels
Due to the increased width of the rim, I was able to drop the air pressure a bit, and enjoy the increased volume in the tire/rim void (wider rims that I normally ride). I ran 28/32# for the first ride rather than my typical 30/35#. This provided fantastic traction, and seemed to almost smooth over the ride a bit when riding chunder at speed. The better traction also allowed for my being able to clear some hills that I havent been able to in the past. I will drop the air pressure further to test some limits.
These rims are STIFF, which I appreciate. Under my weight, I typically can feel some deflection in wheels as I take corners/berms at speed, but these held true. I found that I actually needed to adjust my mid-turn steering, and never felt like they would be bounced offline (save for my own mistake)
The hubs are extremely quiet with decent engagement. My personal preference is for a bit louder of a hub, perhaps with quicker engagement. I suppose the quiet hub tricks my mind a bit into thinking that the freehub is slipping. If I bought the wheels, I would likely consider adding the 32-tooth ratchet adapter to the hub to increase engagement frequency.
The only issue I found was related to that cool centerlock assembly. Mid-ride, my rear wheel began to sound horrible (almost like 2-3 spokes had come undone). I stopped a few times to check, but didnt find anything abnormal. After the third stop, I noticed that the centerlock had some loose, and my rear rotor was vibrating/bouncing around. It was still engaged with the 6-prongs, so the brake still worked if needed, but I essentially rode home with only the front brake. I pulled both the front and rear wheels and tightened up the centerlocks using a bit of extra oompf. I will see how it goes in future rides, but I may consider pipe-tape or a drop of threadlock if this happens again. I have reached out to the DT Swiss rep, and they responded saying that threadlock would do the trick, and for me to double-check the torque on the centerlock.
Stay tuned and dont hesitate to ask questions.
-Gord
Now with my tire mounting dramas out of the way, I thought I'd share my initial thoughts on these wheels:

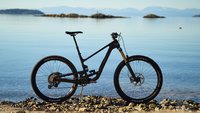
Special delivery!
1. Wider is better.
At 25mm internal width, these rims are wider than my stock setup, and probably wider than most alloy rims available for the enduro market. I've been reading a lot of good things about the benefits of a wider rim, and can't wait to see if the promises of better traction, better compliance and flat resistance are true. It all makes sense in theory - we'll see how it translates to the real world.
2. Eyelets for the win.
Not really debatable, but if you're even remotely hard on wheels - you'd better make sure your rims have spoke eyelets. I once made the mistake of trying a discount rim without eyelets. I'm not sure if eyelet-free rims are even a thing anymore - I sure hope not. Needless to say, the DT's have 'em.

Eyelets. You need these.
Clever (if problematic) disc interface.
DT have come up with an interesting method to accommodate both Shimano splined discs and the standard 6 bolt discs everyone else uses. After hearing about Gord's problem with the lock ring coming loose, I could see how a bit of disc chatter or vibration might cause this to happen. I assembled mine with a bit of blue locktite. Hopefully this helps keep things tight.
Proprietary spokes.
With a nightmarish experience involving a Mavic DeeMax wheelset in my past, I am justifiably wary of proprietary spoke systems. These DT's seem well executed, and I can only hope that replacement spokes aren't too hard to come by. Let's hope I never have to look.
Whisper-silent freehub body.
I like it. Some people like noisemakers on their bike - I'm not one of those people. Before installing the cassette, spinning the body by hand gives the impression that you're holding a well-built piece of kit. It's stiff in a reassuring way.
Understated good looks.
I've tried my best to keep my ride properly murdered out, and while these wheels have a few splashes of polished aluminum here and there - it's done perfectly. The silver hubs and tasteful logos work well to compliment the aesthetic of the wheelset. Just enough bling factor without being obnoxious.

The Swiss always know what they're doing.
My next post will be after some local rides. The forecast is calling for proper Shore conditions in the next few days - two thumbs up for mud! :)

Praying for rain.
Thats a nice looking rig!
Thanks James! It rides as good as it looks :coo:
Updated my initial reviews with pictures.
Centerlock is holding strong through the second ride after some elbow-grease and a bit of locktite.
-Gord
So it sounds like from the reviews that their straight pull spokes are staying tight and solid. That is pretty impressive. Always been wary of them from some bad experiences. but obviously DT Swiss has figured out a better way of doing it?
I have had to do a couple of tightens in the last few days, but just the old quarter turn all round. Still running very true - the rear is out by a small amount now.
I will do a more thorough inspection and re-tensioning before retallack
Sent from my iPhone using Tapatalk
So, my initial ride on these wheels was an all around good experience. I did a few laps on Fromme in proper Shore weather (i.e.: wet). Trails included Executioner, Dream Weaver, No Quarter Climb, Baden Powell, Expresso and Skull. Like the other testers, I noticed they were measurably stiffer than my stock setup. Since I was still playing with air pressures with new tires, I feel I was running higher pressures than I might otherwise have run, and never had any harsh rim strikes. Even after a good, hard smashing down Executioner and Skull, both rims are straight as an arrow. Impressive. I also checked spoke tension after the ride - no loose spokes. On the technical traverses where lots of little half-pedal strokes were required, I did notice the lower engagement of the freehub ratchet. It was a bit annoying at first, but I got used to it after a while.
The ride was not entirely without issue though.
Halfway through the ride, I went to release some air pressure from the front tire, and as I was unthreading the plastic cap, it unthreaded the entire valve core assembly from the stem. This resulted in a surprising rush of air out of the stem. I panicked and quickly shoved the cap back on and threaded it back on tight. I was worried about messing with it too much in the middle of a ride, so I just left it as it was. I think some Stan's sealant must have worked its way into the valve core and cap and partially glued the whole thing together. When I got home, I carefully unthreaded the plastic cap:

Valve stem and valve core assembly.
I managed to get the cap off without the entire core coming out. I looked at the thing for a moment and wondered how I could tighten the valve core into the valve stem without stripping the threads. It was then that I remembered these random plastic widgets that were included with the wheels. I had no idea what they were, but decided against tossing them out. Good decision! It turns out they're little wrenches for removing/installing new valve cores into the stems. I'm pretty sure there was no documentation on what exactly these things were, or maybe I'm just ignorant and everyone but me knows about them. Either way, I was rightfully proud to have figured it out!

Widgets! How do they work?

Widgets doing their thing.
I'll keep one of these little guys in my pack on every ride now. It's almost impossible to keep sealant from getting into the valve occasionally, and this tiny piece of plastic will save you from a blowout if you've inadvertently glued the whole works together.
So now you know!
Another option is to not put the cap on since it does nothing
Ahh not true! If you cut the top of the cap off it makes your presta an instant ghetto schrader. Good for pump options if you're stranded.
The plastic widget thingy did have instructions somewhere in the wheel package. If you are using the tubeless injection method through the valve stem using a syringe, then these are very much required.
Out of the box, I found I had to tighten each valve core a half-turn.
-Gord
Forum jump: