DVO Diamond Teardown
It was getting to be around ‘that time’ for old Uncle Dave’s DVO Diamond. Nowhere near enough hours to justify a full tear down of the air system and damper, but with some summer rides it was feeling a little over-shagged from riding in the off-season. Perfect scenario for a DVO Diamond teardown.
Normally a basic lower service is easily handled by any competent mountain bike shop, or at home if you have the space, time, and interest. In this case I asked Alex Woikin, formerly of Marzocchi Canada fame and now working at SuspensionWerx, to show us what makes DVO’s Enduro Race Fork slick.
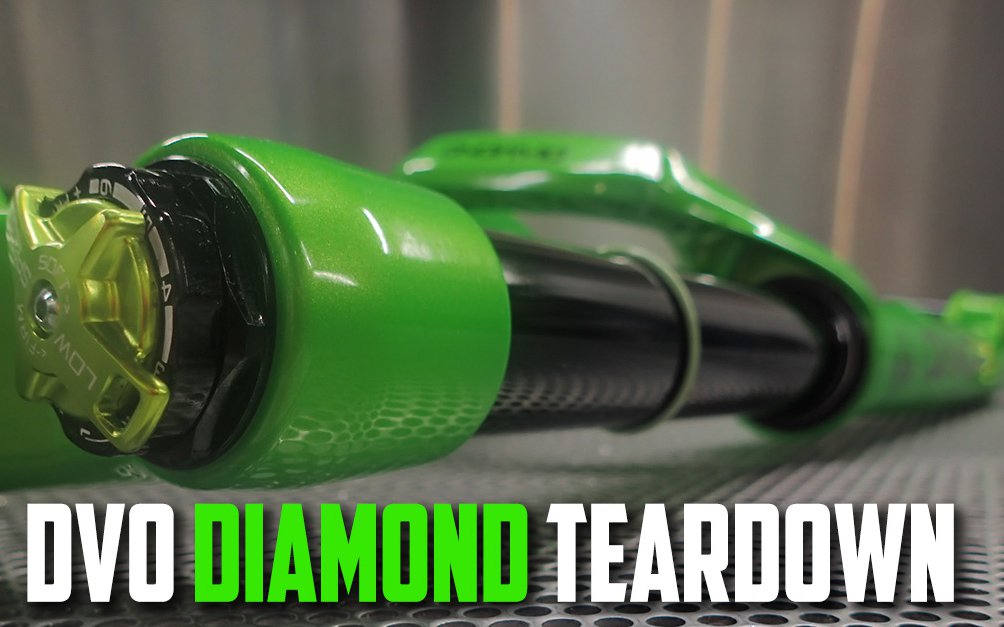
A few scratches on the decals but that bright green paint finish is holding up. You can tell a lot about a man from his fork… for example, Uncle Dave does all his crashing & bashing on the drive side of his bike.
Alex knows the whole show at DVO going back to their days heading up Marzocchi USA and he’s been riding the Diamond fork and Topaz shock on his own bike, so I booked an appointment and he was happy to take me through a basic tear down.
The DVO Diamond Teardown
Dave has somewhere around 50hrs on this fork so it shouldn’t need seals or a cartridge bleed at this point. Alex will inspect all the internals for obvious issues when the fork is apart but here we are looking to improve performance by cleaning and re-lubing the chassis components.
Alex starts off by removing the knobs from the damper side of the fork (watch out for those little ball bearings for the detents) and then starts in on the Diamond’s foot nuts. He wore his best green shorts for the job, but apparently his new DVO tech shirt is in the mail.
Slick looking foot nuts removed. The air side includes the O.T.T. (Off The Top) adjuster and the damper side includes the rebound adjuster. More evidence here that Dave is particularly hard on the drive side of his bike.
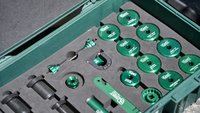
You want to be certain to use a chamfer-less (low-profile or flat) socket whenever you are working on suspension. Abbey Tools makes a very sweet alloy set if you have ‘the itch’ to buy nice things, Unior makes a high quality (and very affordable) option, or, if you like making friends, there are any number of places that can grind the chamfer off a standard socket for you.
With many forks the air system would also be re-lubed during the basic service. However, in a similar vein to the Öhlins RXF 34, the Diamond is using a cartridge style air system that is self-contained and easily replaceable/serviceable on its own.
Likewise, dampers using a closed bladder system should provide great performance well past 50hrs of riding and I would expect it to perform well until being bled during a full service, when the main seals are replaced, somewhere around 100hrs of riding.
Cartridge air system. Bladder-style closed damper cartridge, lowers, uppers (Crown Steerer Unit / CSU), foot nuts, adjuster knobs, air cap.
Single unit wiper/oil seal, ‘foam’ ring (in this case a heavier felt ring than is common in many forks), and bushing. Both sides get cleaned out and inspected.
Compared to many other forks the Diamond’s main seal system uses a smaller, much denser, black felt ring as opposed to the more common foam rings. As part of your service you will want to clean these rings by gently squeezing out any old lube they contain and then soaking them in the same oil you are using for bath lube.
The Diamond also has a relatively large gland between the seals’ wiper edge and the felt ring, which is a great place to stockpile some Slickoleum to keep the fork running smooth through dry & dusty summers and wet & granular winters.
An oil bath for the felt rings.
Generous helping of Slickoleum between the felt ring and the seal’s wiper. Expect a bit of excess to show on your stanchion for the first 1-2 rides post service.
Time for lower lube (35cc damper side / 25cc air side). Alex will shoot part of the bath oil in from the top of the lowers (to ensure the bushings are fully lubricated from day one), slide the lowers on to the uppers in a horizontal mambo, and then shoot the rest of the bath oil in through the lowers before inserting the foot nuts.
More green anodizing – even inside the fork! Lowers on; re-inserting the damper cartridge. It gets hand-tightened into place (as the does the air system) and you crank them down after you have tightened the foot nuts.
It’s a great idea to insert some of the bath lubricant in through the top of the lowers during reassembly with any fork using a hydrodynamic bushing. Put more plainly, after you soak & reinsert the foam rings and Slickoleum the hell out of the seal, hold the lowers horizontally and squirt in some of the bath lube before sliding them on to the uppers. It isn’t necessary, but it is the best practice if you hate friction. You do hate friction, right?
If you find getting everything lined-up stressful, after you slide the lowers back on, try playing some Barry White in the background. Then insert the rest of the bath lube in from the bottom.
Almost finished. Alex has torqued the foot nuts down (25nm) and then the top caps (20nm). Time to re-install the adjusters, air it up, take a picture and then return it to Uncle Dave.
Damper adjuster knobs re-installed.
When your fork is bright F#cking green it is easy to miss nice little finishing details like the air side top cap.
Back to Uncle Dave and his 2016 Devinci Spartan, which just happens to be the same bike that Alex is ripping on, for the long term ride review on the fork.
Would you like to try a DVO fork?


Comments
Julien Gabriel Cleto
7 years, 10 months ago
Why does the article keep saying "Emerald"?
I hope someone makes a video of a full damper service and air spring assembly service!
Reply
Kirk Junkunis
7 years, 10 months ago
This is great. Was considering a Diamond, as they're much cheaper new from my LBS than the comparable Fox/Rockshox.
Maybe a full review is in order? I would love to hear specifically about cost of self-servicing and durability. -and where to find parts in Canada. My LBS stocks the fork, but not the seals or the fluid!
Thanks for this!
Reply
bk201
7 years, 10 months ago
can you make a tuning guide with your own experience ? and the explanation of the oil route? I'd appreciate it
Reply
DrewM
7 years, 10 months ago
Hello bk201,
Apologies for the delayed response. DVO actually has a wealth of set-up information on their website including a complete set of recommend base tunes by weight and a break down of each of the forks features.
Setup is so specific to what bike your fork is on, what stem length/bar width you run (how your weight is distributed over the front end of the bike), the terrain you ride, your ability, and of course your weight that beyond giving you a solid starting point (and DVO has the most indepth base settings of any manufacturer I know of) tuning the fork is going to be highly subjective.
Anyways, here is the link: . It would be very cool if every company offered a similar base setup/explanation for their forks (rather than just an air pressure range).
Uncle Dave will address any unique set-up experiences he had when he reviews the fork.
Reply
Please log in to leave a comment.