REVIEW – Transition Blindside
Transition Bicycle Company from Ferndale, Washington has been building a following slowly but steadily over the last couple of years. Founders Kyle Young and Kevin Menard have done that by turning out solid, well-built bikes for people who are looking for something a little out of the ordinary. The company’s 11-bike line-up includes eight full-suspension models and three hardtails catering to every riding discipline, from downhilling and bike parks to dirt jumping or singletrack. Most Transition full squish bikes make use of the proven and reliable four-bar design, which uses a pivot on the seat stay (as opposed to a Horst Link design with a pivot on the chain stay).
The first big bike from Transition, the Grand Mal, offered 8.75” of rear travel but it was retired in 2007 to make way for something new – the 8” Blindside. I’ve been beating the crap out of a Blindside for about eight months now, and I’ve had a lot of fun getting to know this bike. I’ve also noticed some changes in my riding that likely wouldn’t have been possible without this long-term beat down. Here’s the whole story.
The bike
The Blindside is a burly bike that’s built for people who ride hard or go large, and that’s apparent in the frame details. Using a more traditional design (rejoice, haters of swoopy frames!), the Blindside is built in Taiwan from 6000-series heat treated aluminum. It offers 205mm / 8.1” of rear wheel travel, and comes standard with an ISCG mount.

The Transition Blindside, freshly assembled and ready for a bike park beatdown. || Photo: Stuart Kernaghan
Angles and measurements on the Blindside are a mixture of the standard and non-standard. The bike is available in three sizes – small, medium, and large. Each bike has the same length of seat tube (17”) and standover height (30”), with the difference between sizes showing up in the top tube length. The size Large bike I was testing had a 23.6” top tube, which is a little shorter than some other 8”-travel bikes out there.
The Blindside had a 65° head angle with a fork that sports an axle-to-crown length of 578mm; the Marzocchi 888 that went on the bike has an axle-to-crown length of 567mm, adding about 0.5° of steepness. There is an actual / effective seat tube angle of 68.5° / 73.5°, chain stay length of 17.15” and a wheelbase of 47”. BB height is 14.2”.
The rear shock is mounted under the top tube, rather than in front of the bottom bracket, as you see in some other bikes using this suspension design. Normal rear shock spec choices are a Fox DHX 5.0 coil shock or DXH 5.0 air shock; my frame arrived with a Marzocchi Roco air shock, but I switched to the DHX 5.0 coil part way through the test.
A OnePointFive head tube allows you to run any kind of long travel fork you want. You can also spec an e-type front derailleur, which mounts between the bottom bracket and the frame on the Blindside, if you figure you’ll be doing some climbing. The bottom bracket has a 73mm shell, so almost any BB will fit without a problem.

The Blindside uses a mix of proven four-bar technology and a slightly different shock position to achieve the desired ride. || Photo: Stuart Kernaghan
Out the back, there’s room for an 8” rotor and 2.8” tires should fit in the frame without a problem. The rest of the rear end details deviate a little from what you might expect to find on this type of bike, however. Unlike some dedicated downhill sleds, the Blindside uses 135mm rear wheel spacing instead of 150mm. 12mm x 135mm thru axle dropouts are come stock, but you can also purchase 10mm x 135mm quick release dropouts.
One particularly nice feature on the Blindside is the option of running Transition’s own floating brake kit. Seat tube mounting brackets for the floating brake are located on the non-drive side of the seat tube, so it’s just a matter of bolting on the brake if you’re interested. I started the test without the floating brake, but installed it after a few weeks of testing.
Because this was a frame test, I built the Blindside up with a collection of parts that I had around the house, including a Transition Revolution FR wheelset with Maxxis Minion DH rubber, SRAM X-9 drivetrain, Avid Code brakes, Truvativ Holzfeller OCT cranks and a Gravity single-ring chainguide. Transition was kind enough to provide a Marzocchi 888 fork and Roco DH World Cup air shock for the test.
The complete bike weighed in at just over 43lbs. with the floating brake kit and air shock; that jumped up to just under 45lbs. with the coil shock. Frame weight is 8.6lbs. without a shock. The Blindside comes with a one-year warranty against defects, and a lifetime crash replacement.

The floating brake kit mounted to the Blindside. The rod and caliper mount separate braking forces from the rear suspension. || Photo: Stuart Kernaghan
Riding the Blindside
Hopping on the Blindside was an interesting experience. I’ve spent much of the last couple of years riding 7” bikes with long-travel single crown forks, so moving to an 8” bike with a double crown took a bit of an adjustment. But it was worth making the change. At about 250 or 260lbs. all kitted up for the bike park, I tend to be hard on bikes. (And wheels, but that’s another matter.) I don’t like a bike that squirms under me or feels twitchy, and I had high hopes that I wouldn’t run into either of those issues with the Blindside – particularly with the parts that were installed.
My first stop with the bike was the Whistler Bike Park. Where else can you dial your suspension and set-up as quickly? It’s bike tester heaven, especially when you’re tweaking a new ride to your own personal preferences. Once I got the brakes / bars / shifters set up the way I liked, I worked on the suspension. That took a little longer, but was worth the time. Then it was down to the serious testing.

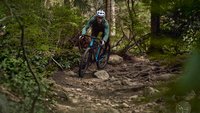
Stunts like this wall ride at Whistler were fun on the Blindside. The smaller frame made it easy to manoeuvre. || Photo: Vicki Cunningham
One of the things I was most curious about was the way the bike would ride both without and with the floating brake. Transition shipped the frame with the floating brake kit, but I wanted to run the Blindside without it to see how it handled the wicked braking bumps in the park. Would the back end skip around as you might expect with this type of suspension design? And if it did, how much would that affect ride quality?
I’m not a physicist or an expert in suspension designs, so I’m not going to get into a prolonged discussion of what’s happening with the rear end, with axle paths or even the proper terminology for all of this. There are plenty of people out there who can and have done just that.
What I will say is that the rear end on four-bar bikes like the Blindside (but not bikes that use a Horst Link design) tend to stiffen up under hard braking in rough terrain and can skip around. It does this because the brake caliper is mounted on the frame and braking forces are tied to the rear suspension. Floating brake kits were invented to solve this specific issue by separating braking forces from suspension movement. Look around and see which frames use floating brakes – it’s not a coincidence that most of them use a four-bar suspension design with a pivot on the seat stay.
I spent the first four or five days on the Blindside up at Whistler, riding without the floating brake kit. It quickly became apparent that the bike handled well in virtually every situation I came across – the fast sections, jumps, technical descents and drops that characterize the park.
But the back end did skip and stiffen up when braking hard while coming into corners with stutter bumps. It wasn’t a major issue, and I worked around it by modifying my braking technique. And it didn’t factor in on other trails that had large one-off hits, or when I was coming off drops. The rear end handled all of those situations very well, thanks to the oversized pivots and beefy stays. There was very little, if any, flex in the rear end of the bike. The Blindside liked being ridden hard, and performed even better when I let the bike do its thing. Runs that I knew well just kept getting faster and faster, and I was sailing further than ever on the tables. And that was before I made any modifications to the bike.

The Blindside really shone at speed, as well as in technical terrain. Combine the two for added fun. || Photo: Dan Barham
The next step was to add the floating brake kit and see if that changed the way the rear end tracked. That involved swapping the 10mm QR axle for a 12mm thru axle, as well as mounting the arm of the floating brake on the frame and reattaching the caliper. The whole process wasn’t overly complicated, but it did take about an hour to complete, largely because there was paint in the mounting hole on the frame. Once the job was done, I headed up to Whistler again and started the testing process all over again.
For those of you not familiar with the floating brake, it provides a separate mounting point for the brake caliper that isn’t attached to the rear triangle. The rear suspension is able to compress, but the rod portion of the kit keeps the caliper in place. There are a set of bearings that allow the caliper mount to rotate around the rear axle, independently of any other forces. The rear end is able to compress without taking the brake with it, meaning that the design attributes that lead to skipping and stiffening are negated.
So, does it work in a real-world situation? Yup, it does. Quite well, in fact. I was able to notice a significant improvement in both ride quality and my ability to brake while going over stutter bumps almost immediately. Corners that had been decidedly sketchy at speed without the kit were much more manageable when the rear suspension was allowed to do its thing. I could carry more speed into corners, brake hard, and still feel in control. The more I rode with the floating brake, the less of an issue the suspension design was. In fact, it became a non-issue.
As I mentioned at the beginning of this review, I rode the hell out of the Blindside over the last eight months. I rode in a variety of different locales, in wet and dry conditions. I maintained it, I tweaked it and I crashed on it. And what I came away with after all that time was an intimate knowledge of this bike – much better than you could ever get during a short test period.

It was easy to get air on the Blindside, in spite of the 43lb. weight. Landings were also very solid, even when the takeoff wasn’t. || Photo: Dan Austin
I got to know how it handled at speed. And the fact that it came to life as things started moving faster. I got to know how it liked to go fast on the straightaways, but also how it was able to get air very easily. Tabletop jumps at Whistler that used to be a challenge became increasingly easy as I became familiar with this bike. I got to know how it liked the steeps, and was easy to navigate through tight turns in the trees. I also grew to appreciate how the Blindside made it possible for me to feel comfortable on progressively bigger drops.
Handling on the Blindside was good, in spite of the long stem and high-rise bar. It didn’t feel twitchy at all, and it was able to tuck into corners very well. The angles are great for bike park or Shore-style riding, and there was no wheel flop at any time. A 65.5° head angle isn’t DH slack but it also isn’t slopestyle steep. That leaves a lot of room in between for the average rider who wants a bike that can handle the types of trails mere mortals attempt.
The wheelbase is a fraction shorter than some other 8” bikes, which takes away a little of that couch-like ride you get on a really long bike, but it also makes it more agile when you’re riding trails with trees to thread through, skinnies with corners on them and bridges to cross on trails – kind of like Mount Seymour’s Corkscrew trail.
A 14.2” bottom bracket height is on the higher side of things, but it didn’t make the bike feel tippy in the way that some high BBs can. It will also save you from smashing your cranks on hard landings or when you’re cruising through rock gardens.
Although I didn’t test the Blindside with a long-travel single crown, I don’t feel like I missed out on anything. This kind of bike wants to be ridden hard, and for someone my size, that generally means double crown. Towards the end of the test, I switched from the Roco air shock to a Fox DHX 5.0 coil shock, and the ride quality improved noticeably as soon as I did. The back end was much livelier, particularly on tighter terrain, and the whole bike seemed to wake up. Choose the coil option if you can.

The Blindside was at home hammering rough, technical lines on the Shore. It felt firmly planted at all times, and capable of charging through almost anything. || Photo: Vicki Cunningham
One last thing to note about this bike is the weight. The Blindside was just over 43lbs. with the initial build and air shock, but by the time the test was over and I had switched the stem and shock, it was 45lbs. That’s not outside the norm for this type of bike, but it does make for some serious heft when you’re riding Shore-type trails that include stunts, small uphill sections or even climbs.
On the other hand, that heft was a nice thing in the bike park. The bike felt incredibly solid in every situation, especially on rougher terrain. And surprisingly, it wasn’t hard to get in the air or manoeuvre around once it was in the air. I never felt sketched out on the tables at Whistler, and I was always able to push out the front end to get a few extra feet on the trannies.
The Blindside will perform well for anyone who’s willing to push this bike. You can’t sit back and expect to get the most out of it, though. And while the ride may not be exactly earth-shattering, it is solid, stable, comfortable, predictable and confidence inspiring, thanks in large part to a well thought-out design.
A few issues to bring up
Although the Blindside was a lot of fun to ride, there were a few minor issues. Attaching the floating brake to the frame was a bit of a nuisance, because the threads on the frame mount hadn’t been chased after the frame was painted. Frames coming directly from a shop shouldn’t have this problem.
Another minor headache was the routing for the rear brake cable. It runs beside the rear shock, inside the front attachment point for the shock itself. This means you have to remove the shock if you want to do anything with the brakes.
Maintenance is part of the deal when you buy a bike, and the Blindside wasn’t anything different. The pivots loosened up over time, which isn’t uncommon on multi-pivot bikes. Most of them were easy enough to deal with, and I tightened as needed. The only one that was a pain in the ass was the one behind the crankset, and I dealt with that when I swapped out a funky BB.
The pivots are a great example of one of the things that you learn about when you test a bike for months, as opposed to weeks (or week, as the case is with some print mags) – things get loosen up, they squeak, they wear out or they fail. Nothing failed on the Blindside, and nothing other than the tires wore out. The floating brake did develop a little bit of a rattle, but I can handle tightening something like that once or twice over the course of an extended test. The finish on the black front triangle isn’t quite as pretty as it once was, either, but that just means it’s been well loved. The Blindside frame itself has required very little in the way of maintenance, and to me, that says a lot – given the amount of abuse it has been subjected to during the test.

Launching off stunts like this one at Silver Star were a piece of cake, thanks to my confidence in the bike. || Photo: Dan Austin
The largest issue I had with the bike was the size of the frame itself. Each of the three frames use a 17” seat tube, but the effective top tube length on the Large frame I was riding was only 23.6”. At 6’4”, that was a little short for my liking, particularly when I was hitting jumps or drops. The handlebar felt as though it was too far underneath me when I landed.
The best solution for the short top tube issue was to ditch the direct-mount Marzocchi stem and run something longer. I ended up using a 70mm Race Face Diabolus D2 stem with 0° of rise and a 40mm rise bar. That put the handlebar exactly where I wanted it and gave me a lot more confidence in the bike. It may not have been the standard bike park chic and I lost some of the stiffness that comes with a direct mount stem, but it did the job for me.
The short seat tube also means that it’s going to be difficult for taller riders to climb on the Blindside. There isn’t enough room in the seat tube for a longer seatpost, but there are telescoping post options out there. Climbing a 45lb. bike isn’t anybody’s idea of fun, but it is possible – provided you can get the seat high enough. That had never been one of my goals or expectations for this bike, though, so the short seat tube really wasn’t an issue for me. Keep it in mind if you want to or need to climb on this bike.
Final thoughts
I beat the piss out of this bike. I’ve ridden the Blindside on the Shore, at Whistler, in Pemberton and at Silver Star for eight months, and have given it very little love other than an occasional wash and pivot tightening. The Blindside has stood up to the test of time and while it may not be as pretty as the first day I rode it, it’s still a very faithful steed.
The bike rode well in just about every situation I threw its way, particularly when the going got steeper / faster / rougher / more technical. This is not a bike for shy riders who like smooth, flowy trails. This is a bike for riders who like to go hard, to push themselves and their equipment.
I know that my riding improved on the Blindside. I rode harder, faster, more aggressively and more confidently on this bike than I have on any other bike. And I’ve ridden a fair number of bikes. I did things that I wouldn’t have on a smaller bike, and the number of “oh shit” moments I had in the eight-month test period could be counted on one hand. I can’t say the same thing for my personal bike.
This is also a good bike for larger (i.e. heavier) riders. As I mentioned, I’m pushing 250lbs. when I’m all kitted up. The Blindside never creaked or groaned, it never protested and it wasn’t flexy underneath me. It felt stable from the get-go, and that was one of the things that really helped give me confidence to go faster and push myself.

Rocky lines like this became easier and easier as I got to know the bike, and I stared seeking them out to test myself and the bike. || Photo: Vicki Cunningham
One closing comment on the rear suspension. The four-bar design on the Blindside may not be the latest or greatest, but it works well in most applications. Whether you spend your hard-earned cash on a floating brake kit to improve the ride quality should depend on the type of riding you’re doing. If it’s Shore-style trails with one or two hits in a row, then it’s probably not necessary. But if you’re riding high-speed terrain with lots of stutter bumps, if you’re riding rough, technical downhill terrain where you want the rear end firmly planted on the trail, then it’s likely worth the investment.
I spent a lot of time during this test thinking about the Blindside. Thinking about what it was, and what it wasn’t. Thinking about how it stacked up to other big hit bikes in the lift line or on the trail. And thinking about what set this bike apart from others. Thinking about why you would buy this bike.
At the end of the day, the truth is that you don’t buy a bike like the Blindside because you love the suspension design or where it’s made or what it’s made from or even necessarily the way it rides. Buying a bike like this is about making a choice. You’re making a choice to support Transition Bikes, and what the company stands for. It’s a choice to buy a bike that’s built by a smaller company that is connected to the riding scene, that is owned by riders, that supports riders, that embodies things that are important to you as a rider.
It’s also a choice to ride something that not everyone will have. It’s a choice to fly your own flag. To be different and make a statement with your bike. If those are the kind of things that are important to you, then you should be looking for the Transition dealer in your neighbourhood.
Pros
- strong, solid and confidence-inspiring ride
- bike that likes to be worked hard
- plenty of standover
- flies very well, in spite of the weight
- good bike for larger riders
- floating brake option
- customizable looks with sticker kit
- something different than everything else out there
Cons
- short seat tube
- short top tube
- rear brake cable routing
- can be a little heavy, depending on build
MSRP for the Blindside frame is US$1,649 with a 2009 Fox DHX 5.0 coil shock. You can also add a fork and build kit to the package, if you’re interested.
Like the look of the Blindside? Got questions on how it would work in your neck of the woods? Feel like you HAVE to argue suspension design? Head over to the boards and do your thing.


Comments
Please log in to leave a comment.